本文是科普向的文章,介绍了 Ansi Escape Sequences 在日常编码生活中的作用
Ansi Escape Sequences 可以用于控制 cursor 的位置,颜色;字体样式以及作为 Terminal 的控制命令使用。所有序列都以 ESC 字符开头,第二个字符则是所在分类的标识。
ESC 字符等价于
- Ctrl-Key:
^[ - 八进制:
\033 - Unicode:
\u001b - 十六进制:
\x1b
比如下面的代码是等价的,均输出红色的 hello world
In [7]: print("\033[31m{message}\033[0m".format(message="hello world"))
hello world

In [8]: print("\x1b[31m{message}\x1b[0m".format(message="hello world"))
hello world

In [9]: print("\u001b[31m{message}\u001b[0m".format(message="hello world"))
hello world
通常我们接触到比较多的分类就是:
ESC ]: OSC – 操作系统命令(Operating System Command)ESC [: CSI - 控制序列导入器(Control Sequence Introducer)
所有分类可以参考 Wiki
CSI 序列#
文本渲染#
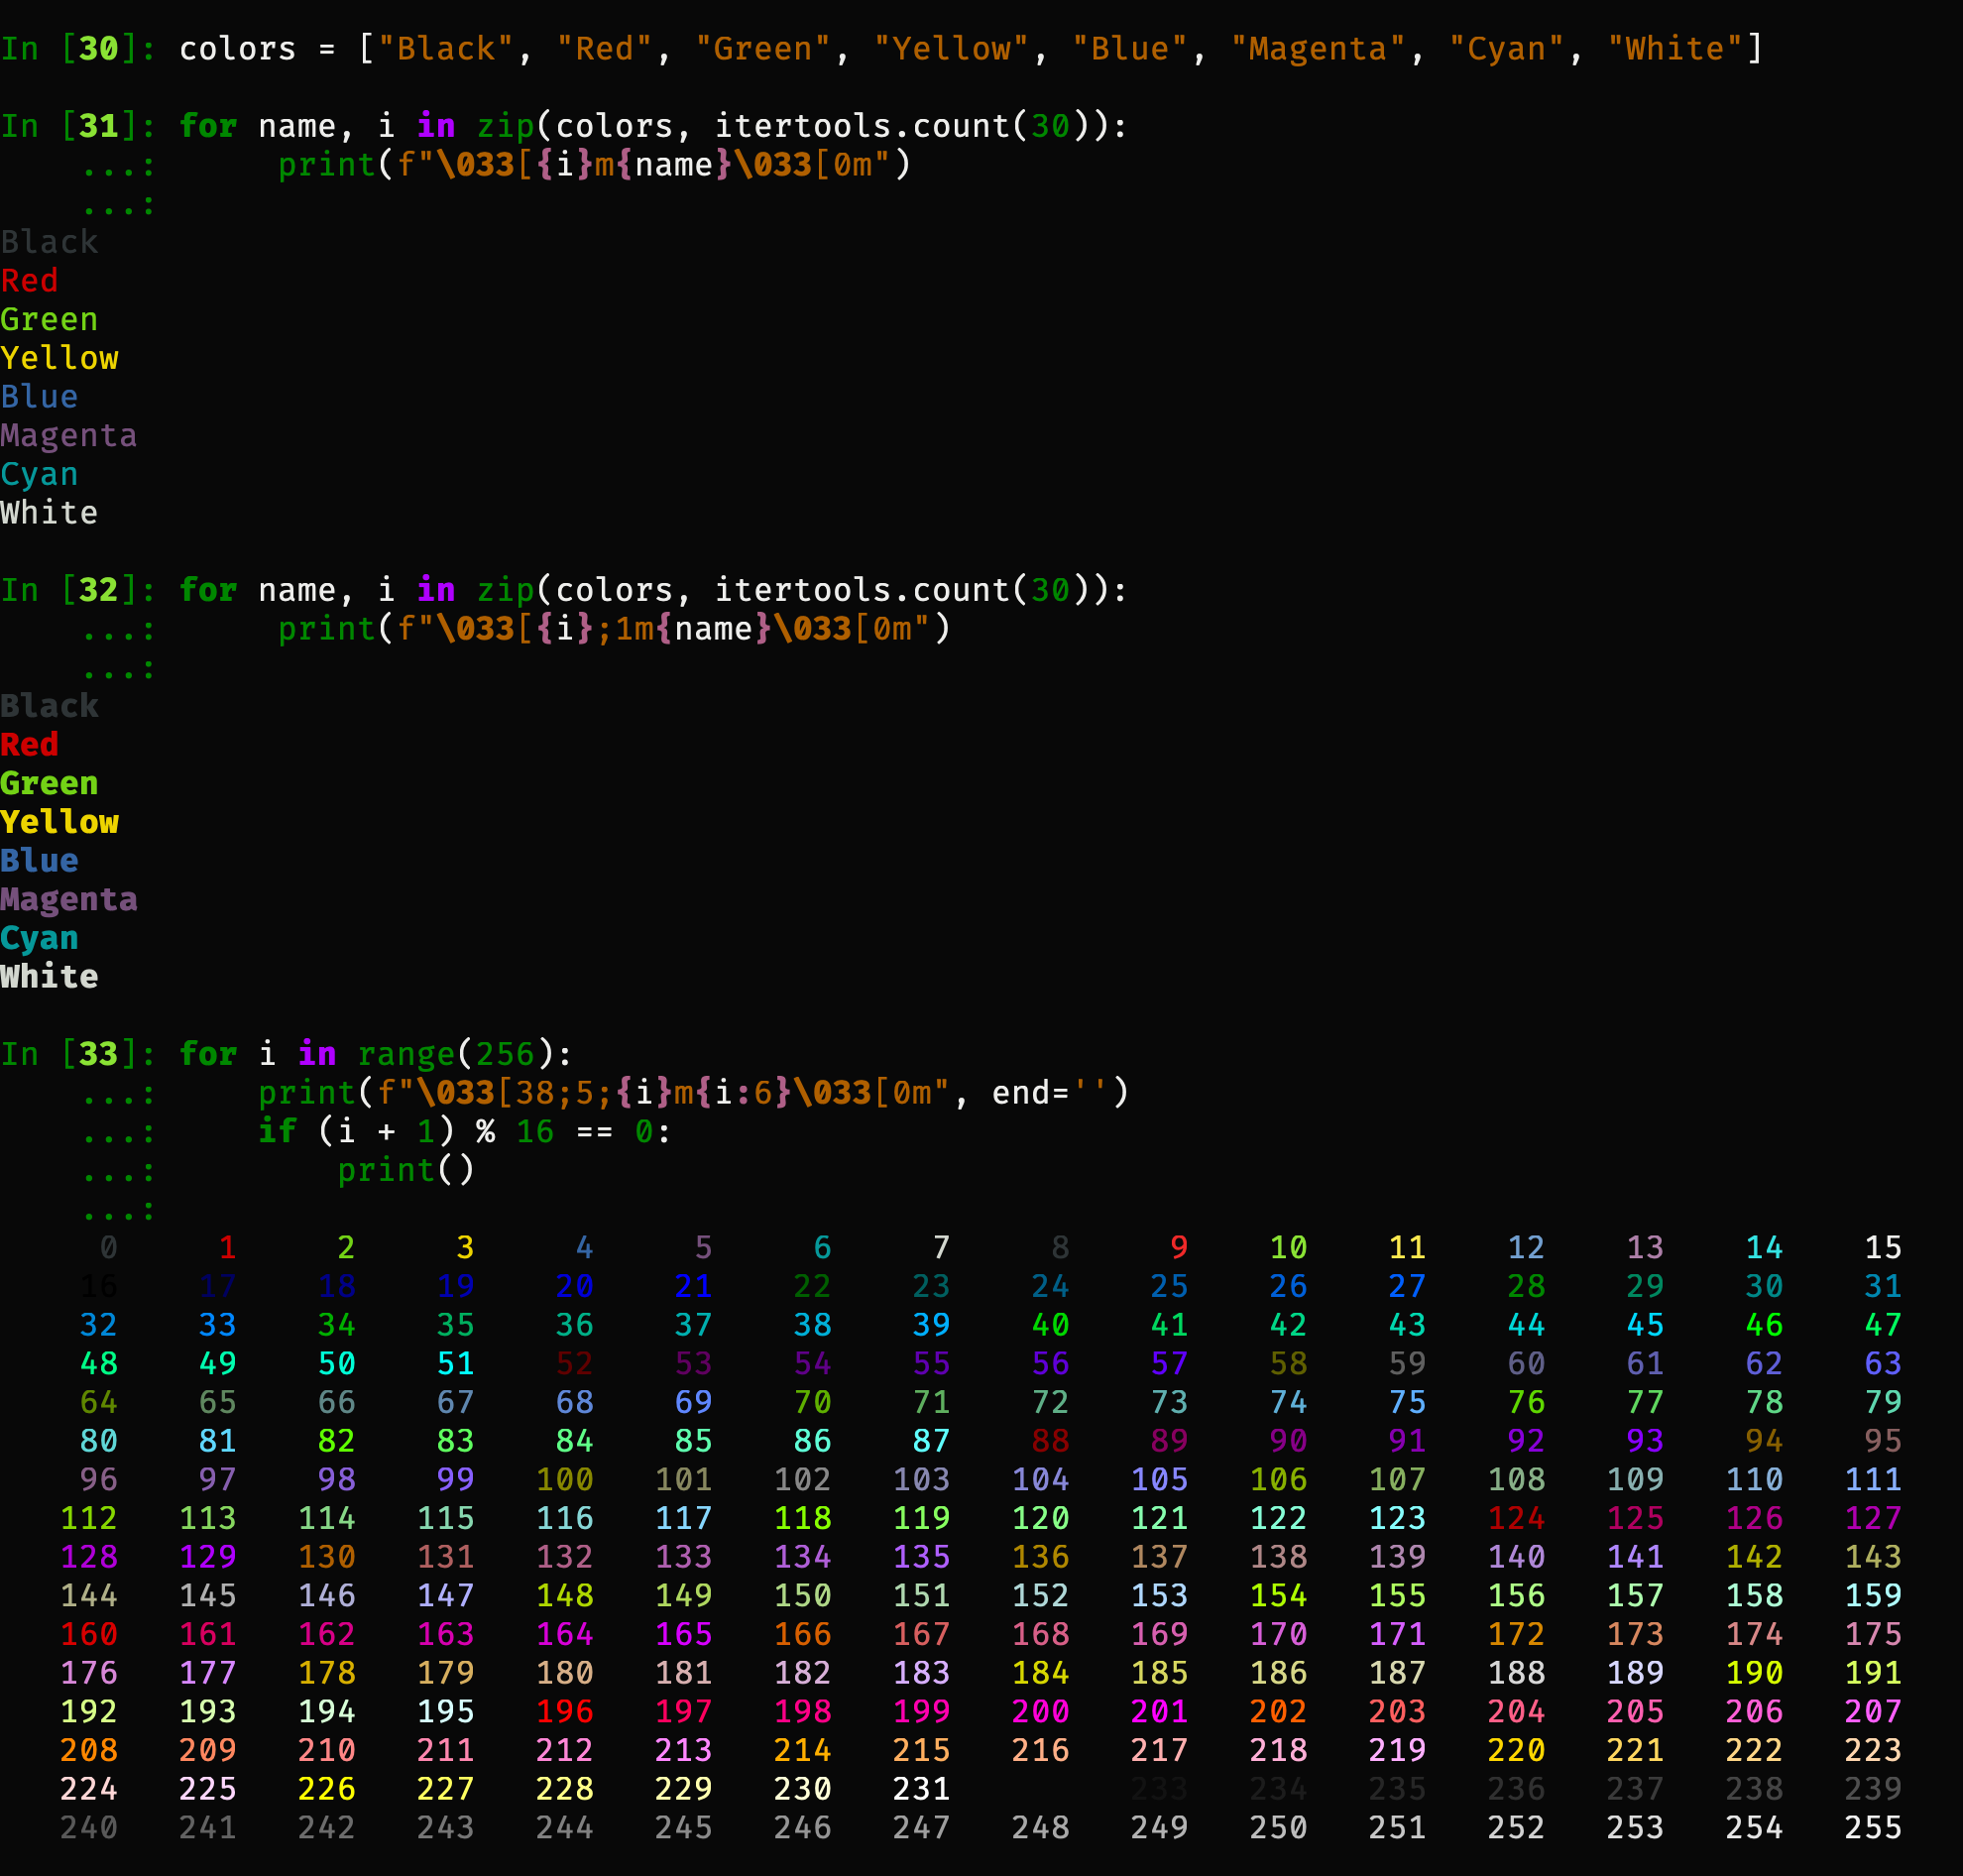
在终端输出颜色是最常见的,比如 Python 中的颜色库 colorama,其原理便是用到了 CSI 序列。在 3 bit 下前景色和背景色格式均为 \033[{颜色码}m,是通过颜色码的值范围来区别的。前景色占 [30, 37],背景色则为 [40, 47]。\033[0m则可以重置我们的颜色和样式。所以我们可以将需要特殊渲染的文本放在 \033[{i}m 和\033[0m中间
对于 3 bit 的前颜色,可以由如下代码输出
colors = ["Black", "Red", "Green", "Yellow", "Blue", "Magenta", "Cyan", "White"]

for name, i in zip(colors, itertools.count(30)):
    print(f"\033[{i}m{name}\033[0m")
对于 4 bit 颜色,就是在 3 bit 颜色的基础上增加了色彩深度。格式为 \033[{颜色码};1m 的表示亮色,就是在 3 bit 的基础上添加了 ;1 字符。关于不同 bit 下的颜色可以参考 色彩深度
In [32]: for name, i in zip(colors, itertools.count(30)):
    ...:      print(f"\033[{i};1m{name}\033[0m")
    ...:
而对于 8 bit 颜色,因为如果要直接塞,占用的数值空间太大。这里就二级编码了,格式则变成了
- 前景色
ESC[38;5;{颜色码}m - 背景色
ESC[48;5;{颜色码}m
这里颜色码的范围是 0 到 255
In [33]: for i in range(256):
    ...:     print(f"\033[38;5;{i}m{i:6}\033[0m", end='')
    ...:     if (i + 1) % 16 == 0:
    ...:         print()
    ...:
上述代码运行结果可以参考下图

最后我们来看看 24 bit 颜色,即我们所说的 True Color 是怎么表示的。目前支持 True Color 的终端可以在这份列表中找到 ,或者执行这个脚本。这个脚本便是利用的转义序列

24 bit 下的格式为
- 前景色
ESC[38;2;{r};{g};{b}m - 背景色
ESC[48;2;{r};{g};{b}m
其中 {r} {g} {b} 代表的是 RGB 颜色值。
除了颜色上的控制,我们也可以使用转义序列来控制字体风格:
\033[2mset dim/faint mode\033[3mset italic mode\033[4mset underline mode\033[5mset blinking mode\033[7mset inverse/reverse mode\033[8mset invisible mode\033[9mset strikethrough mode
光标控制#
其次我们经常用 curl 或者 wget 这种命令,或者我们安装某个 Package 的时候,都会有进度条。
test.zip 100%[=====================================================>] 21.90K --.-KB/s in 0.02s
这其实也可以通过 Ansi Escape Sequence 来做到。我们需要控制 cursor 的位置,因为需要在同一行上反复刷新内容
向上:
\033[{n}A向下:
\033[{n}B向右:
\033[{n}C向左:
\033[{n}D
{n} 为移动的字符数目,如果移动字符数目超过当前的字符数目,则不会继续移动。比如当前 cursor 在 50 字符的位置,那么 \033[1000D 不会将 cursor 移动到上一行,会停在本行的最左侧。
import time


def loading():
    total = 100

    for i in range(1, total + 1):
        print(
            "\033[1000D{percent:3}%  [{process:<50}]".format(
                percent=i, process="=" * int((i / 100 * 50))
            ),
            end="",
            flush=True,
        )
        time.sleep(0.05)


loading()
以此类推,可以实现多行的进度条
import time
import operator
import random
import functools


def one_loading(percent: int) -> None:
    print(
        "\033[1000D{percent:3}%  [{process:<50}]".format(
            percent=percent, process="=" * int((percent / 100 * 50))
        ),
        end="",
        flush=True,
    )


def multi_loading(count: int) -> None:
    process = [0] * count
    current_cursor = 0

    while True:
        if all(map(functools.partial(operator.eq, 100), process)):
            break

        for idx, current_percent in enumerate(process):
            next_percent = min(current_percent + random.randint(1, 10), 100)

            if current_cursor > idx:
                print(
                    "\033[{n}A".format(n=abs(current_cursor - idx)), end="", flush=True
                )
            elif current_cursor < idx:
                print(
                    "\033[{n}B".format(n=abs(current_cursor - idx)), end="", flush=True
                )

            current_cursor = idx
            process[idx] = next_percent
            one_loading(next_percent)
            time.sleep(0.01)


multi_loading(4)
除此之外还有更多的光标控制序列,可以参考文档
OSC 序列#
关于 OSC 序列,每个终端支持程度不一样。有些还有自定义的 OSC 序列,可以参考以下内容:
- Xterm https://invisible-island.net/xterm/ctlseqs/ctlseqs.html#h3-Operating-System-Commands
- ITerm2 https://iterm2.com/documentation-escape-codes.html
OSC 52#
如果我们想在 ssh 后的 shell 中复制一段文本,最简单的方式是使用鼠标选中然后复制。如果没有鼠标,我们该如何做呢?OSC 52 可以在这个时候帮助我们。格式为 '\033]52;{clipboard};{base64_data}\07'。其中的 clipboard 用于选择使用哪个剪贴板,主剪贴板是 c,base64_data 则是 base64 编码(RFC-4648)后的内容。此操作需要在 Terminal 中勾选 “Applications in terminal may access clipboard” 的选项(如果有的话,比如 ITerm2),不同 Terminal 操作不同,可以 Google。我们可以在执行下面的代码,然后查看自己的粘贴版中的内容是否为 hello
print('\033]52;c;aGVsbG8=\07') # Python code
如果我们在 TMUX 下,那么我们需要使用额外的字符编码才能生效。格式为
print("\033Ptmux;\033\033]52;c;aGVsbG8=\x07\033\\") # Python Code
对于 Vagrant + Vim 的用户,可能对于这个 hterm/osc52.vim 比较熟悉。我一直以来也是用的这个脚本,但是这有个问题就是复制的时候会闪一下。写这篇文章的时候看了一下源代码。闪屏的原因是因为
exec("silent! !echo " . shellescape(a:str)) " Vim Code
!echo 是执行的 shell 命令,会让 Vim 切回 Shell 环境中,然后再切回来。改进的方法就是直接向 Shell 进程 的 STDOUT 输出。可以参考 remove-copy.vim