今天研究了一下 Kong,大致跟着 doc 的流程来了一遍
Installation#
Kong 支持 PostgreSQL 和 Cassandra 两种数据库。本文使用 Postgresql(因为我没用过 Cassandra),并直接使用 docker 部署
PostgreSQL
$ docker run -d --name kong-database -p 127.0.0.1:5332:5432 -e "POSTGRES_USER=kong" -e "POSTGRES_DB=kong" postgres:9.4
开启 Kong
$ docker run -d --name kong --link kong-database:kong-database -e "KONG_DATABASE=postgres" -e "KONG_PG_HOST=kong-database" -p 8000:8000 -p 8443:8443 -p 127.0.0.1:8001:8001 -p 127.0.0.1:7946:7946 -p 127.0.0.1:7946:7946/udp kong:latest
说明一下几个端口的含义
:8000 此端口监听 HTTP 请求并转发至上游服务 :8443 此端口也用来转发流量,不过只能是 HTTPS,此端口可以被配置文件所关闭 :8001 admin API 端口,用来管理配置 kong :8444 admin API 的 HTTPS 端口 :7946 用于集群
测试是否启动成功
curl http://127.0.0.1:8001
想要进行配置或者安装额外插件则需要进入容器,默认配置文件在 /etc/kong/kong.conf.default
docker exec -it d5a9fae2bd55 /bin/bash
Kong 是使用 RESTful API 进行后台管理的,为了方便可以使用这个 Web 管理工具 kong-dashboard
docker run -d --link kong:kong -p 8080:8080 pgbi/kong-dashboard:v2 -a username=password
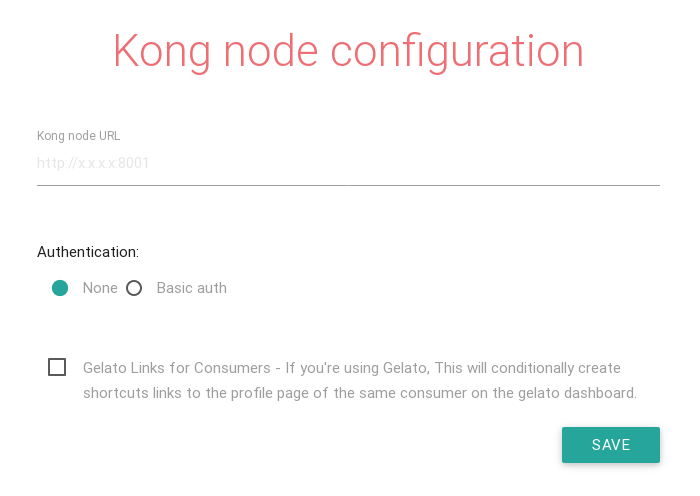
访问 IP 的 8080 端口,进入配置页面,如下图

将 Kong 的节点 http://kong:8001 即可(前面我在启动容器时使用了 link)
Kong 的基本操作#
下面大致就是在翻译官方文档了
示例中使用的 upstream API 选择的是 httpbin。访问 http://httpbin.org/get 即可观察到此次 request 的信息,方便我们查看 Kong 对于 request 做了什么
添加 API#
$ curl -i -X POST \
  --url http://127.0.0.1:8001/apis/ \
  --data 'name=example-api' \
  --data 'hosts=example.com' \
  --data 'upstream_url=http://httpbin.org'
返回 201 Created 则证明 API 添加成功,现在 kong 便会代理这个 API,接下来我们对 kong 发送请求。如果 header 中的 Host 字段为 example.com 则会被转发至上游 http://httpbin.org。简单来说就是 Kong 是根据 Host 来进行的路由
$ curl -i -X GET \
  --url http://163.44.167.40:8000/get\?a\=1\&b\=2 \
  --header 'Host: example.com'
响应如下
HTTP/1.1 200 OK
Date: Sun, 16 Jul 2017 04:51:15 GMT
Content-Type: application/json
Content-Length: 266
Connection: keep-alive
Server: meinheld/0.6.1
Access-Control-Allow-Origin: *
Access-Control-Allow-Credentials: true
X-Powered-By: Flask
X-Processed-Time: 0.0017261505127
Via: kong/0.10.3
X-Kong-Upstream-Latency: 329
X-Kong-Proxy-Latency: 33

{
  "args": {
    "a": "1",
    "b": "2"
  },
  "headers": {
    "Accept": "*/*",
    "Connection": "close",
    "Host": "httpbin.org",
    "User-Agent": "curl/7.38.0"
  },
  "origin": "157.0.72.16, 163.44.167.40",
  "url": "http://httpbin.org/get?a=1&b=2"
}
可以看到 Kong 会自动帮我们修改 request 中的 Host 字段。这个可以选择关闭,但是估计没人这么做
启用插件#
Kong 提供了丰富的插件 请参照文档,除此之外还有第三方的插件
现在我们试一试 JWT 验证插件
首先启用插件
$ curl -X POST http://127.0.0.1:8001/apis/example-api/plugins \
   --data "name=jwt"
example-api 为我们刚才添加的 API 名字,我们也可以对所有的 API 进行配置,即不指定 API 的名称。接下来的所有经过 example-api 的请求都要进行 JWT 验证
Kong 的 JWT 插件中有以下两个概念
- Consumer: a developer or service using the API. When using Kong, a Consumer authenticates itself with Kong which proxies every call to the upstream API.
- Credential: in the JWT plugin context, a pair of unique values consisting of a public key and a secret, used to sign and verify a JWT, and associated to a Consumer.
Kong 中会存储 consumer 的一些信息比如 username 和 consumer_id。然后向 client 分配一个 credential,这个会被作为 JWT 的 payload。当 Kong 验证 JWT 成功后,会使用这个 credential 来索取 consumer 的信息,并添加至 request 的 header 中
创建 consumer
$ curl -i -X POST http://127.0.0.1:8001/consumers \
    --data "username=yourusername" \
    --data "custom_id=yourid"
custom_id 是用来关联其他数据库的,创建成功会返回 201
HTTP/1.1 201 Created
Date: Sun, 16 Jul 2017 07:23:57 GMT
Content-Type: application/json; charset=utf-8
Transfer-Encoding: chunked
Connection: keep-alive
Access-Control-Allow-Origin: *
Server: kong/0.10.3

{"custom_id":"yourid","username":"yourusername","created_at":1500189838000,"id":"be9240f3-d5da-42a0-9665-f49b0f4225f9"}
id 字段是 Kong 存储 consumer 的唯一标识,相当于主键
创建 JWT credential
$ curl -X POST http://127.0.0.1:8001/consumers/{consumer}/jwt -H "Content-Type: application/x-www-form-urlencoded"
{consumer} 处可以为创建 consumer 时返回的 id (be9240f3-d5da-42a0-9665-f49b0f4225f9) 或者 username (yourname)
响应如下
HTTP/1.1 201 Created
Date: Sun, 16 Jul 2017 07:35:44 GMT
Content-Type: application/json; charset=utf-8
Transfer-Encoding: chunked
Connection: keep-alive
Access-Control-Allow-Origin: *
Server: kong/0.10.3

{"secret":"b3dd21a1f6234e1cbc447a61f7af24d2","id":"394528b6-d1a5-4abf-9dc1-0bca41d277ca","algorithm":"HS256","created_at":1500190545000,"key":"636aacb0a78c4978b5c1894f7d30d051","consumer_id":"be9240f3-d5da-42a0-9665-f49b0f4225f9"}
secret为 JWT 加密时用到的 secretid为 credential 的标识algorithm为加密算法,如果为非对称加密算法,还会额外返回一个rsa_public_key字段key也是 credential 的标识,不过是由客户端掌握,会出现在 JWT 的 payload 中,用于
一个 consumer 可以持有多个 credential。可以使用 $ curl -X GET http://127.0.0.1:8001/consumers/{consumer}/jwt 来显示所有的 credential
先生成认证的 signature 来测试一下
In [1]: import jwt

In [2]: jwt.encode(
   ...:         payload={'some': 'payload',
   ...:                 'iss': '636aacb0a78c4978b5c1894f7d30d051'},
   ...:         key='b3dd21a1f6234e1cbc447a61f7af24d2',
   ...:         algorithm='HS256')
Out[2]: 'eyJhbGciOiJIUzI1NiIsInR5cCI6IkpXVCJ9.eyJpc3MiOiI2MzZhYWNiMGE3OGM0OTc4YjVjMTg5NGY3ZDMwZDA1MSIsInNvbWUiOiJwYXlsb2FkIn0.NLmy6Ji1CvDmOpOUXC52_44Z5k5kvE4IF1C5PEVoaIU'
iss 字段(名称可以修改)即为上一步返回的 key,接着我们带上认证信息向 Kong 发送请求
$ curl -i http://163.44.167.40:8000/get \
    -H 'Host: example.com' \
    -H 'Authorization: Bearer eyJhbGciOiJIUzI1NiIsInR5cCI6IkpXVCJ9.eyJpc3MiOiI2MzZhYWNiMGE3OGM0OTc4YjVjMTg5NGY3ZDMwZDA1MSIsInNvbWUiOiJwYXlsb2FkIn0.NLmy6Ji1CvDmOpOUXC52_44Z5k5kvE4IF1C5PEVoaIU'
请求时可以不使用 Authorization header,放在参数为 jwt 的 querystring 中也行 如果成功则会返回 httpbin.org 的响应
{
  "args": {},
  "headers": {
    "Accept": "*/*",
    "Authorization": "Bearer eyJhbGciOiJIUzI1NiIsInR5cCI6IkpXVCJ9.eyJpc3MiOiI2MzZhYWNiMGE3OGM0OTc4YjVjMTg5NGY3ZDMwZDA1MSIsInNvbWUiOiJwYXlsb2FkIn0.NLmy6Ji1CvDmOpOUXC52_44Z5k5kvE4IF1C5PEVoaIU",
    "Connection": "close",
    "Host": "httpbin.org",
    "User-Agent": "curl/7.38.0",
    "X-Consumer-Custom-Id": "yourid",
    "X-Consumer-Id": "be9240f3-d5da-42a0-9665-f49b0f4225f9",
    "X-Consumer-Username": "yourusername"
  },
  "origin": "157.0.72.16, 163.44.167.40",
  "url": "http://httpbin.org/get"
}
当认证成功时,Kong 会添加一些额外 HTTP request header,然后转发给上游的服务。
- X-Consumer-ID, the ID of the Consumer on Kong
- X-Consumer-Custom-ID, the custom_id of the Consumer (if set)
- X-Consumer-Username, the username of the Consumer (if set)
- X-Anonymous-Consumer, will be set to true when authentication failed, and the ‘anonymous’ consumer was set instead.
不过很遗憾,Kong 的 JWT 插件似乎和我想象的稍有不同。目前我希望将数据存储于 payload 之中,然后 Kong 负责验证并且将数据解码存放在 request 的 header 中,这样 backend 的服务便可以直接取数据来用。Kong 的 JWT 插件文档中这样说
When the JWT is valid and proxied to the API, Kong makes no modification to the request other than adding headers identifying the Consumer. The JWT will be forwarded to your upstream service, which can assume its validity. It is now the role of your service to base64 decode the JWT claims and make use of them.
所以如果要用 Kong,还要 backend 解码 base64 才行。另外对于这个插件依靠 consumer 模型,我也抱有疑问。如果我有新用户注册时,需要向 Kong 发送请求来同步 consumer。有人也问了这个问题 Do I need to create a consumer for every user on my website to use the JWT plugging
感觉这个和目前的业务不太相符。蠢作者去 Github 上的 issue 看了看,有人提出了相同的意见 JWT - Send payload as headers to upstream server 并且造了个插件 kong-plugin-jwt-claims-headers